Advanced JHipster WebSockets
RabbitMQ Integration
One of JHipster's extra server-side options is Spring WebSockets. In a generated app, the feature comes with a "Tracker" example. When a user logs in, they start sending each page to which they navigate to the websockets backend. Administrators can view a Tracker page which live updates with any user action. This is a powerful example on its own.
Spring WebSockets works out-of-the-box using an embedded STOMP broker, but if you need more advanced features such as message acknowledgements or more importantly, clustering multiple instances of your application, you need to configure an external broker. This is explained in the Spring WebSockets documentation.
In this post, we will work through the configuration process for using RabbitMQ as an external broker for a new JHipster app. We will also demo a cluster of the JHipster application running through Docker, demonstrating that the websocket messages route to all instances thanks to RabbitMQ. The configuration we set up is interchangeable with other STOMP brokers such as ActiveMQ or HornetQ, feel free to use your choice.

Project Overview
- Environment Setup
- JHipster Project Setup
- Running the App
- Configuring RabbitMQ
- Starting RabbitMQ
- RabbitMQ Management Page
- Clustering Demo
- Conclusion
Environment Setup
For this demo, the only requirements are Java 8, Node v8 (LTS), and Docker. You can manually install RabbitMQ and set up Spring Boot clustering, but Docker greatly simplifies the process. If you want to generate your own project, full instructions for installing JHipster can be found in the JHipster docs.
JHipster Project Setup
First of all, we need a JHipster application to serve the Angular frontend and Spring Boot backend. If you are generating your own application, the important choice for this demo is to enable "Spring WebSockets" when prompted. To keep this demo simple, we will be building upon one of the provided sample generated apps, jhipster-sample-app-websocket.
git clone https://github.com/jhipster/jhipster-sample-app-websocket.git
Running the App
After cloning the project, run yarn install or npm install to install the dependencies. Then run ./mvnw -Pwebpack,dev to start the Spring Boot backend and build the frontend. It will be available in your browser at http://localhost:8080. Sign in with username and password of admin and visit the Tracker page. This page displays any logged-in user's current page. Whenever a user navigates to a new page, the information is sent to the admin if they are subscribed to the tracker topic.
If you open up the browser console, you can see any websocket actions such as subscribing to a topic, sending navigation actions, or receiving other user's actions.
![]() JHipster Tracker Demo
JHipster Tracker Demo
Configuring RabbitMQ
Let's start by adding several configuration values to ApplicationProperties.java file which reads values from yml config files. These will default to the set values, but you can customize them by adding a field such as application.stomp-broker.broker-url to your application.yml
public class ApplicationProperties {
    private final StompBroker stompBroker = new StompBroker();
    public StompBroker getStompBroker() {
        return stompBroker;
    }
    public static class StompBroker {
        private String url = "127.0.0.1";
        private String username = "guest";
        private String password = "guest";
        private int port = 61613;
        public String getUrl() {
            return url;
        }
        public void setUrl(String url) {
            this.url = url;
        }
        public String getUsername() {
            return username;
        }
        public void setUsername(String username) {
            this.username = username;
        }
        public String getPassword() {
            return password;
        }
        public void setPassword(String password) {
            this.password = password;
        }
        public int getPort() {
            return port;
        }
        public void setPort(int port) {
            this.port = port;
        }
    }
}
Note: A benefit of using config variables over hardcoded values is that when running Docker, you can override values with an environment variable. This is used later in the demo.
We'll need to make a few changes to WebsocketConfiguration.java as well. First, add ApplicationProperties to the constructor - model this off of how JHipsterProperties is injected. The next change is to alter the configureMessageBroker method. Change the call from config.enableSimpleBroker to config.enableStompBrokerRelay, then add the lines configuring username, password, broker URL, port, and pathMatcher like below:
// add with the other imports at the top
import org.springframework.util.AntPathMatcher;

@Override
public void configureMessageBroker(MessageBrokerRegistry config) {
    // update method name
    config.enableStompBrokerRelay("/topic")
        // load connection settings for the stomp broker
        .setRelayHost(applicationProperties.getStompBroker().getUrl())
        .setRelayPort(applicationProperties.getStompBroker().getPort())
        // login for backend channels
        .setSystemLogin(applicationProperties.getStompBroker().getUsername())
        .setSystemPasscode(applicationProperties.getStompBroker().getPassword())
        // login for user channels
        .setClientLogin(applicationProperties.getStompBroker().getUsername())
        .setClientPasscode(applicationProperties.getStompBroker().getPassword());

    // required for RabbitMQ only
    config.setPathMatcher(new AntPathMatcher("."));
}
Note: The last line is needed because RabbitMQ requires path separators to use a
.instead of a/. This doesn't matter for our existing websocket mappings but keep it in mind if you use message mappings where messages are sent directly to users.
Lastly, we need to add two dependencies to our pom.xml or gradle config. These are required for handling the TCP communication between the STOMP broker and your backend. For Maven, it looks like below:
<dependency>
    <groupId>io.projectreactor</groupId>
    <artifactId>reactor-net</artifactId>
    <version>2.0.8.RELEASE</version>
</dependency>
<dependency>
    <groupId>io.netty</groupId>
    <artifactId>netty-all</artifactId>
    <version>4.1.2.Final</version>
</dependency>
<!-- add above this line -->
<!-- jhipster-needle-maven-add-dependency -->
While not required, it's recommended to add the following lines to your src/main/resources/logback-spring.xml to lower the amount of logs those dependencies produce:
<logger name="reactor.io.net.impl.netty.tcp.NettyTcpClient" level="INFO"/>
<logger name="io.netty.util.internal" level="INFO"/>
<logger name="io.netty.buffer" level="INFO"/>
Starting RabbitMQ
To run RabbitMQ, we'll be using Docker. Use the following docker-compose file to start a RabbitMQ server with the STOMP and management plugins enabled. You can see the full Dockerfile for the image we are running on Docker Hub. You can set any of the environment variables listed on the official RabbitMQ Docker Hub page to customize the settings if needed. Save this file as src/main/docker/rabbitmq.yml for later use in the clustering demo. To start RabbitMQ, run docker-compose -f src/main/docker/rabbitmq.yml up -d
version: '2'
services:
    rabbitmq:
        image: ruddell/docker-rabbitmq-stomp:latest
        # optional rabbitmq configuration variables
        # environment:
            # for securing connections to rabbitmq
            # - RABBITMQ_DEFAULT_USER=username
            # - RABBITMQ_DEFAULT_PASS=SecurePasswordHere
            # for clustering several rabbitmq containers
            # - RABBITMQ_ERLANG_COOKIE=rabbitmq-secret-cookie
        ports:
            # the management port
            - 15672:15672
            # the stomp port
            - 61613:61613
RabbitMQ Management Page
The RabbitMQ Docker image we started has a management plugin enabled and accessible on port 15672. You can visit the admin page at http://localhost:15672 and login with guest as both the username and password. Here you can see active connected users, the topics they are subscribed to, and even send messages to a specific topic.
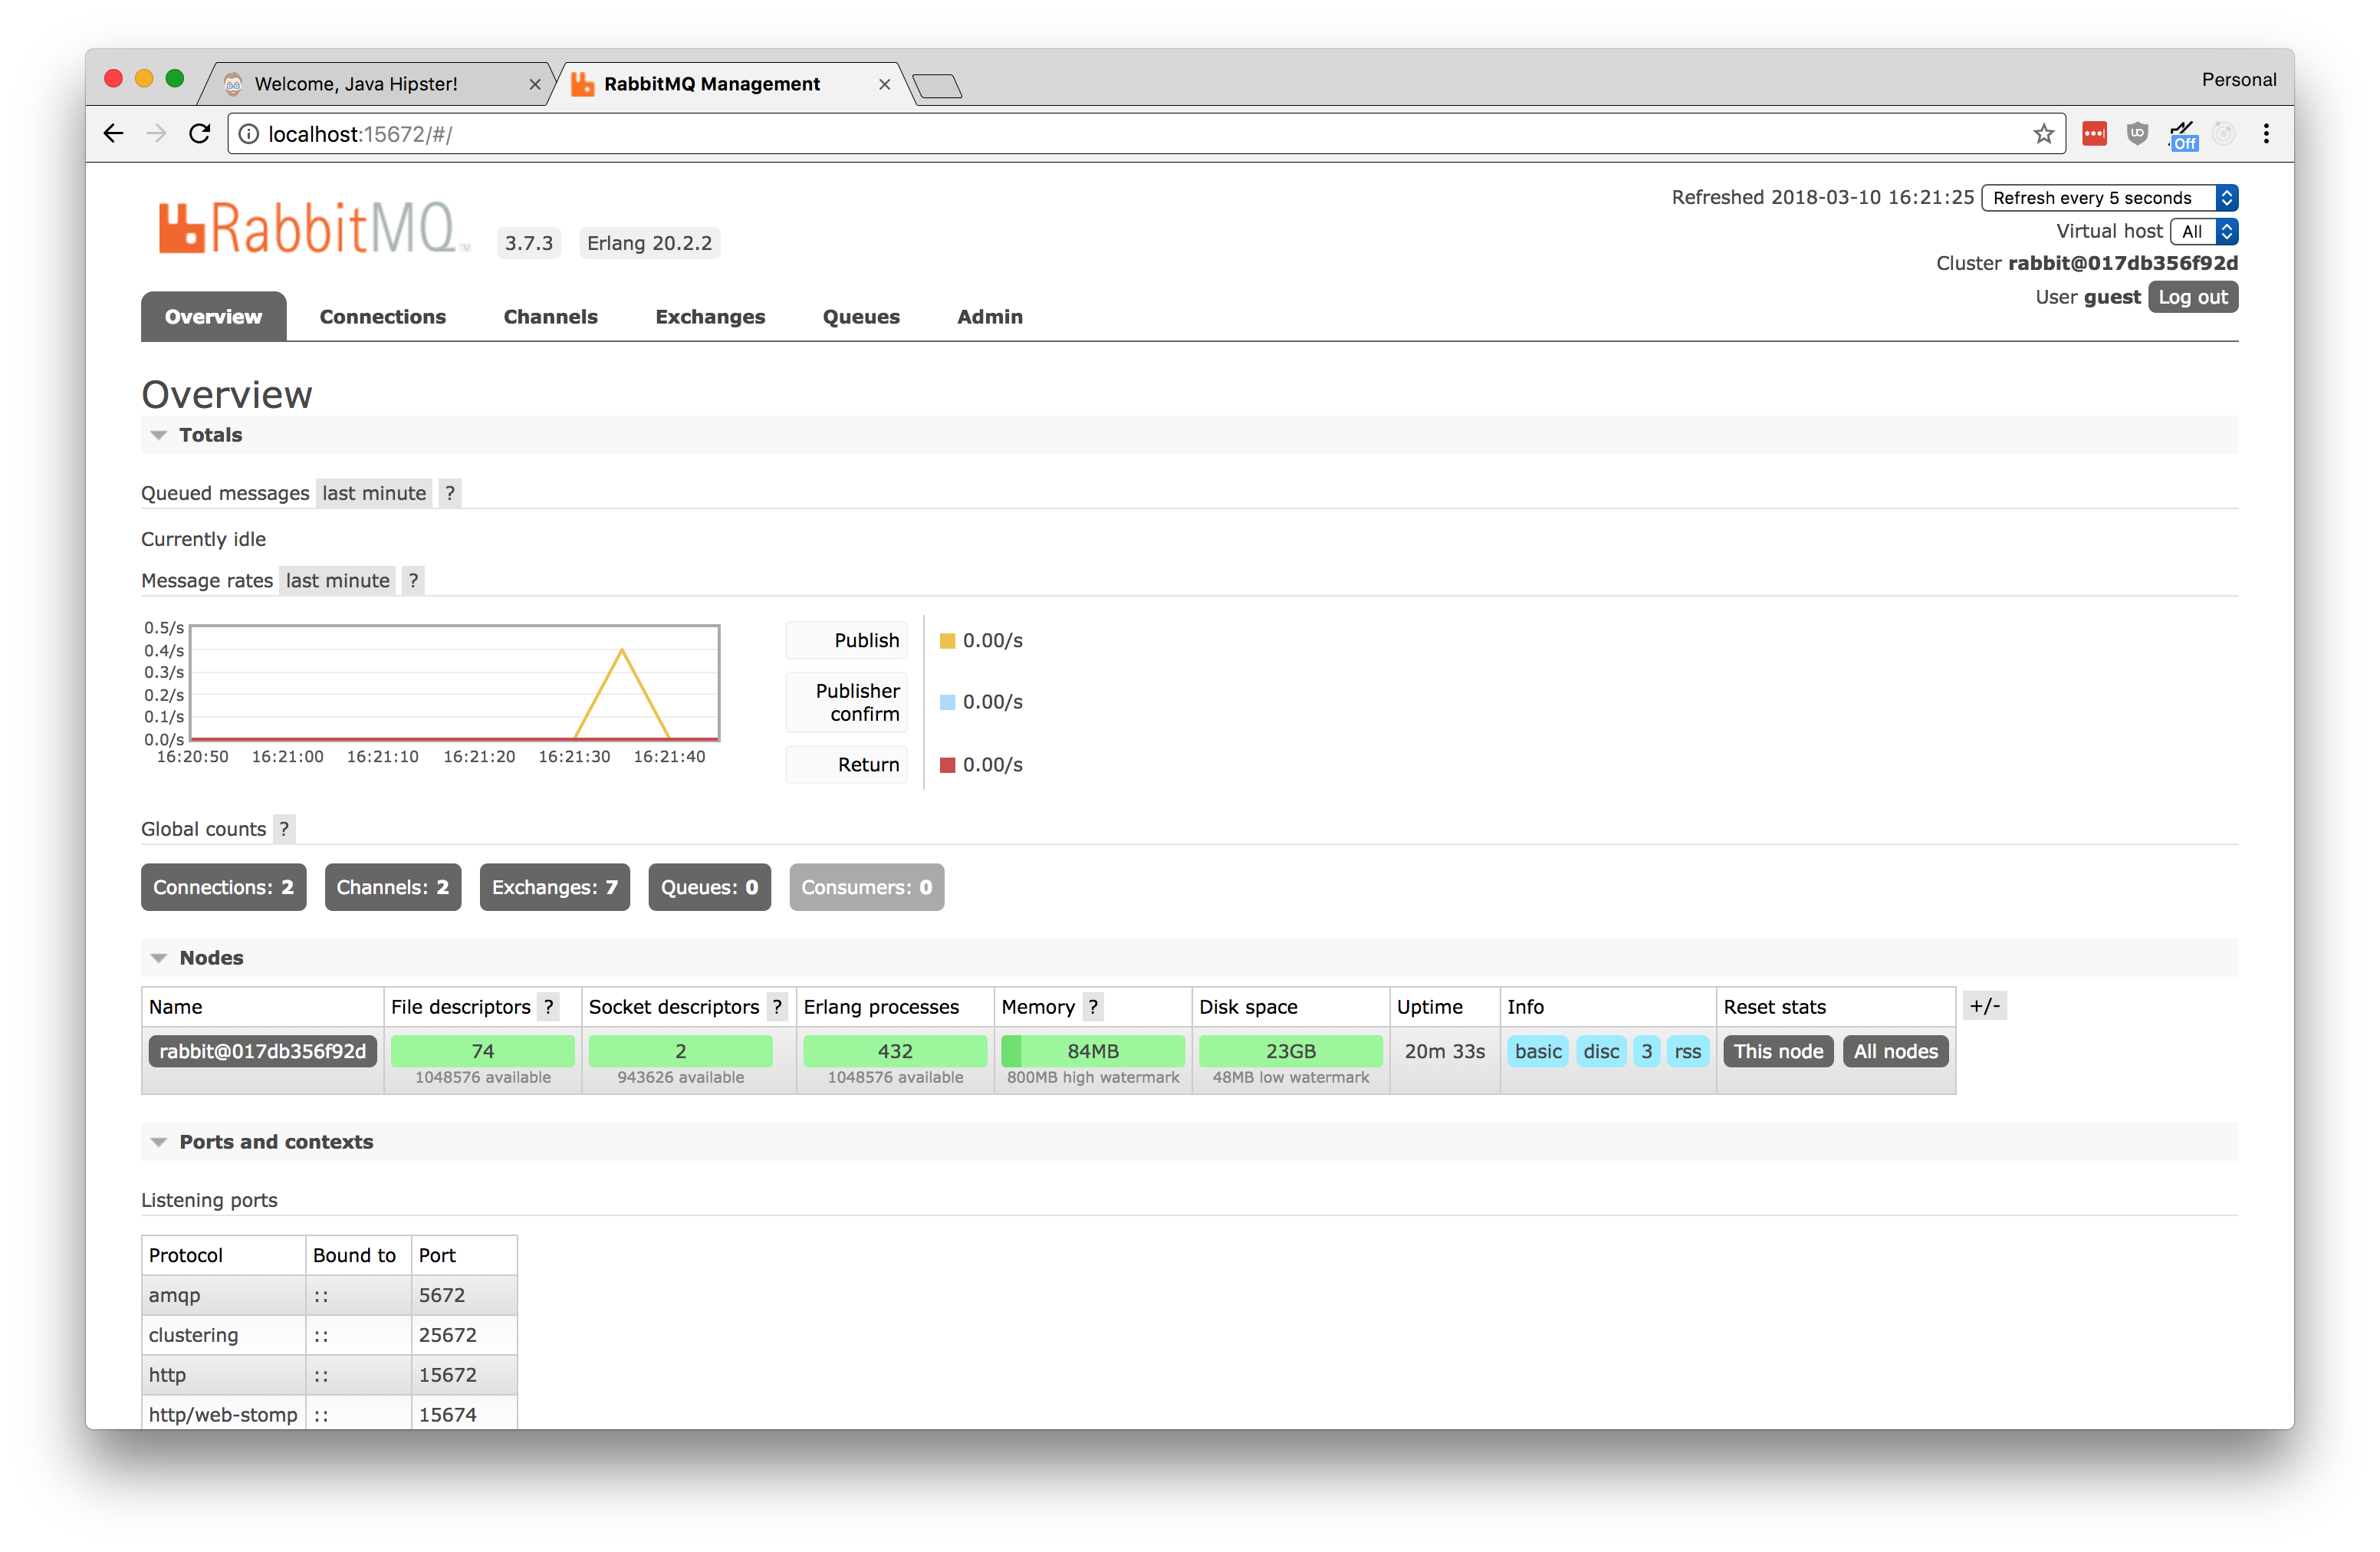 RabbitMQ Management Page
If you restart your JHipster application, you will see that the websockets are working as we configured. The main difference is that the messages are coordinated with RabbitMQ. You should see any connections listed in the RabbitMQ Management pages.
Clustering Demo
To really see the benefits, we need to start up a cluster of applications. To do this, we'll build the application for production, package it into a Docker image, and use docker-compose to run two containers of the same app on different ports.
Build your application with ./mvnw package -Pprod dockerfile:build -DskipTests. This builds a WAR file and packages it into a Docker image. JHipster projects come complete with a docker-compose configuration ready for use. We'll update the file src/main/docker/app.yml so it looks like below. Note the two different application instances running on 8080 and 8081. Also note that we configured RabbitMQ to use a non-default username and password, and set the broker URL to use the Docker container's name. A benefit of this is that it lets us run RabbitMQ without needing to expose ports to outside networks.
Running docker-compose -f src/main/docker/app.yml up -d will start two instances of the app, a MySQL database, and RabbitMQ.
version: '2'
services:
    jhipsterwebsocketsampleapplication-app:
        image: jhipsterwebsocketsampleapplication
        environment:
            - SPRING_PROFILES_ACTIVE=prod,swagger
            - SPRING_DATASOURCE_URL=jdbc:mysql://jhipsterwebsocketsampleapplication-mysql:3306/jhipsterwebsocketsampleapplication?useUnicode=true&characterEncoding=utf8&useSSL=false
            - JHIPSTER_SLEEP=10 # gives time for the database to boot before the application
            # override the default rabbitmq config
            - APPLICATION_STOMP_BROKER_URL=rabbitmq
            - APPLICATION_STOMP_BROKER_USERNAME=rabbitmq-username
            - APPLICATION_STOMP_BROKER_PASSWORD=rabbitmq-password
        ports:
            - 8080:8080
    jhipsterwebsocketsampleapplication-app2:
        image: jhipsterwebsocketsampleapplication
        environment:
            - SPRING_PROFILES_ACTIVE=prod,swagger
            - SPRING_DATASOURCE_URL=jdbc:mysql://jhipsterwebsocketsampleapplication-mysql:3306/jhipsterwebsocketsampleapplication?useUnicode=true&characterEncoding=utf8&useSSL=false
            - JHIPSTER_SLEEP=10 # gives time for the database to boot before the application
            # override the default rabbitmq config
            - APPLICATION_STOMP_BROKER_URL=rabbitmq
            - APPLICATION_STOMP_BROKER_USERNAME=rabbitmq-username
            - APPLICATION_STOMP_BROKER_PASSWORD=rabbitmq-password
        ports:
            - 8081:8080
    jhipsterwebsocketsampleapplication-mysql:
        extends:
            file: mysql.yml
            service: jhipsterwebsocketsampleapplication-mysql
    rabbitmq:
        extends:
            file: rabbitmq.yml
            service: rabbitmq
        environment:
            # set a custom username/password for rabbitmq
            - RABBITMQ_DEFAULT_USER=rabbitmq-username
            - RABBITMQ_DEFAULT_PASS=rabbitmq-password
Now we can verify everything is working as expected. Navigate in one browser to the Tracker page using port 8080. Using port 8081 in a separate browser window, login and navigate around the site. Even though the users are interacting with different instances, the messages are relayed correctly throughout the cluster. If you were to use the embedded simple broker without configuring RabbitMQ, the Tracker page would not display any of the navigation actions from the other instance.
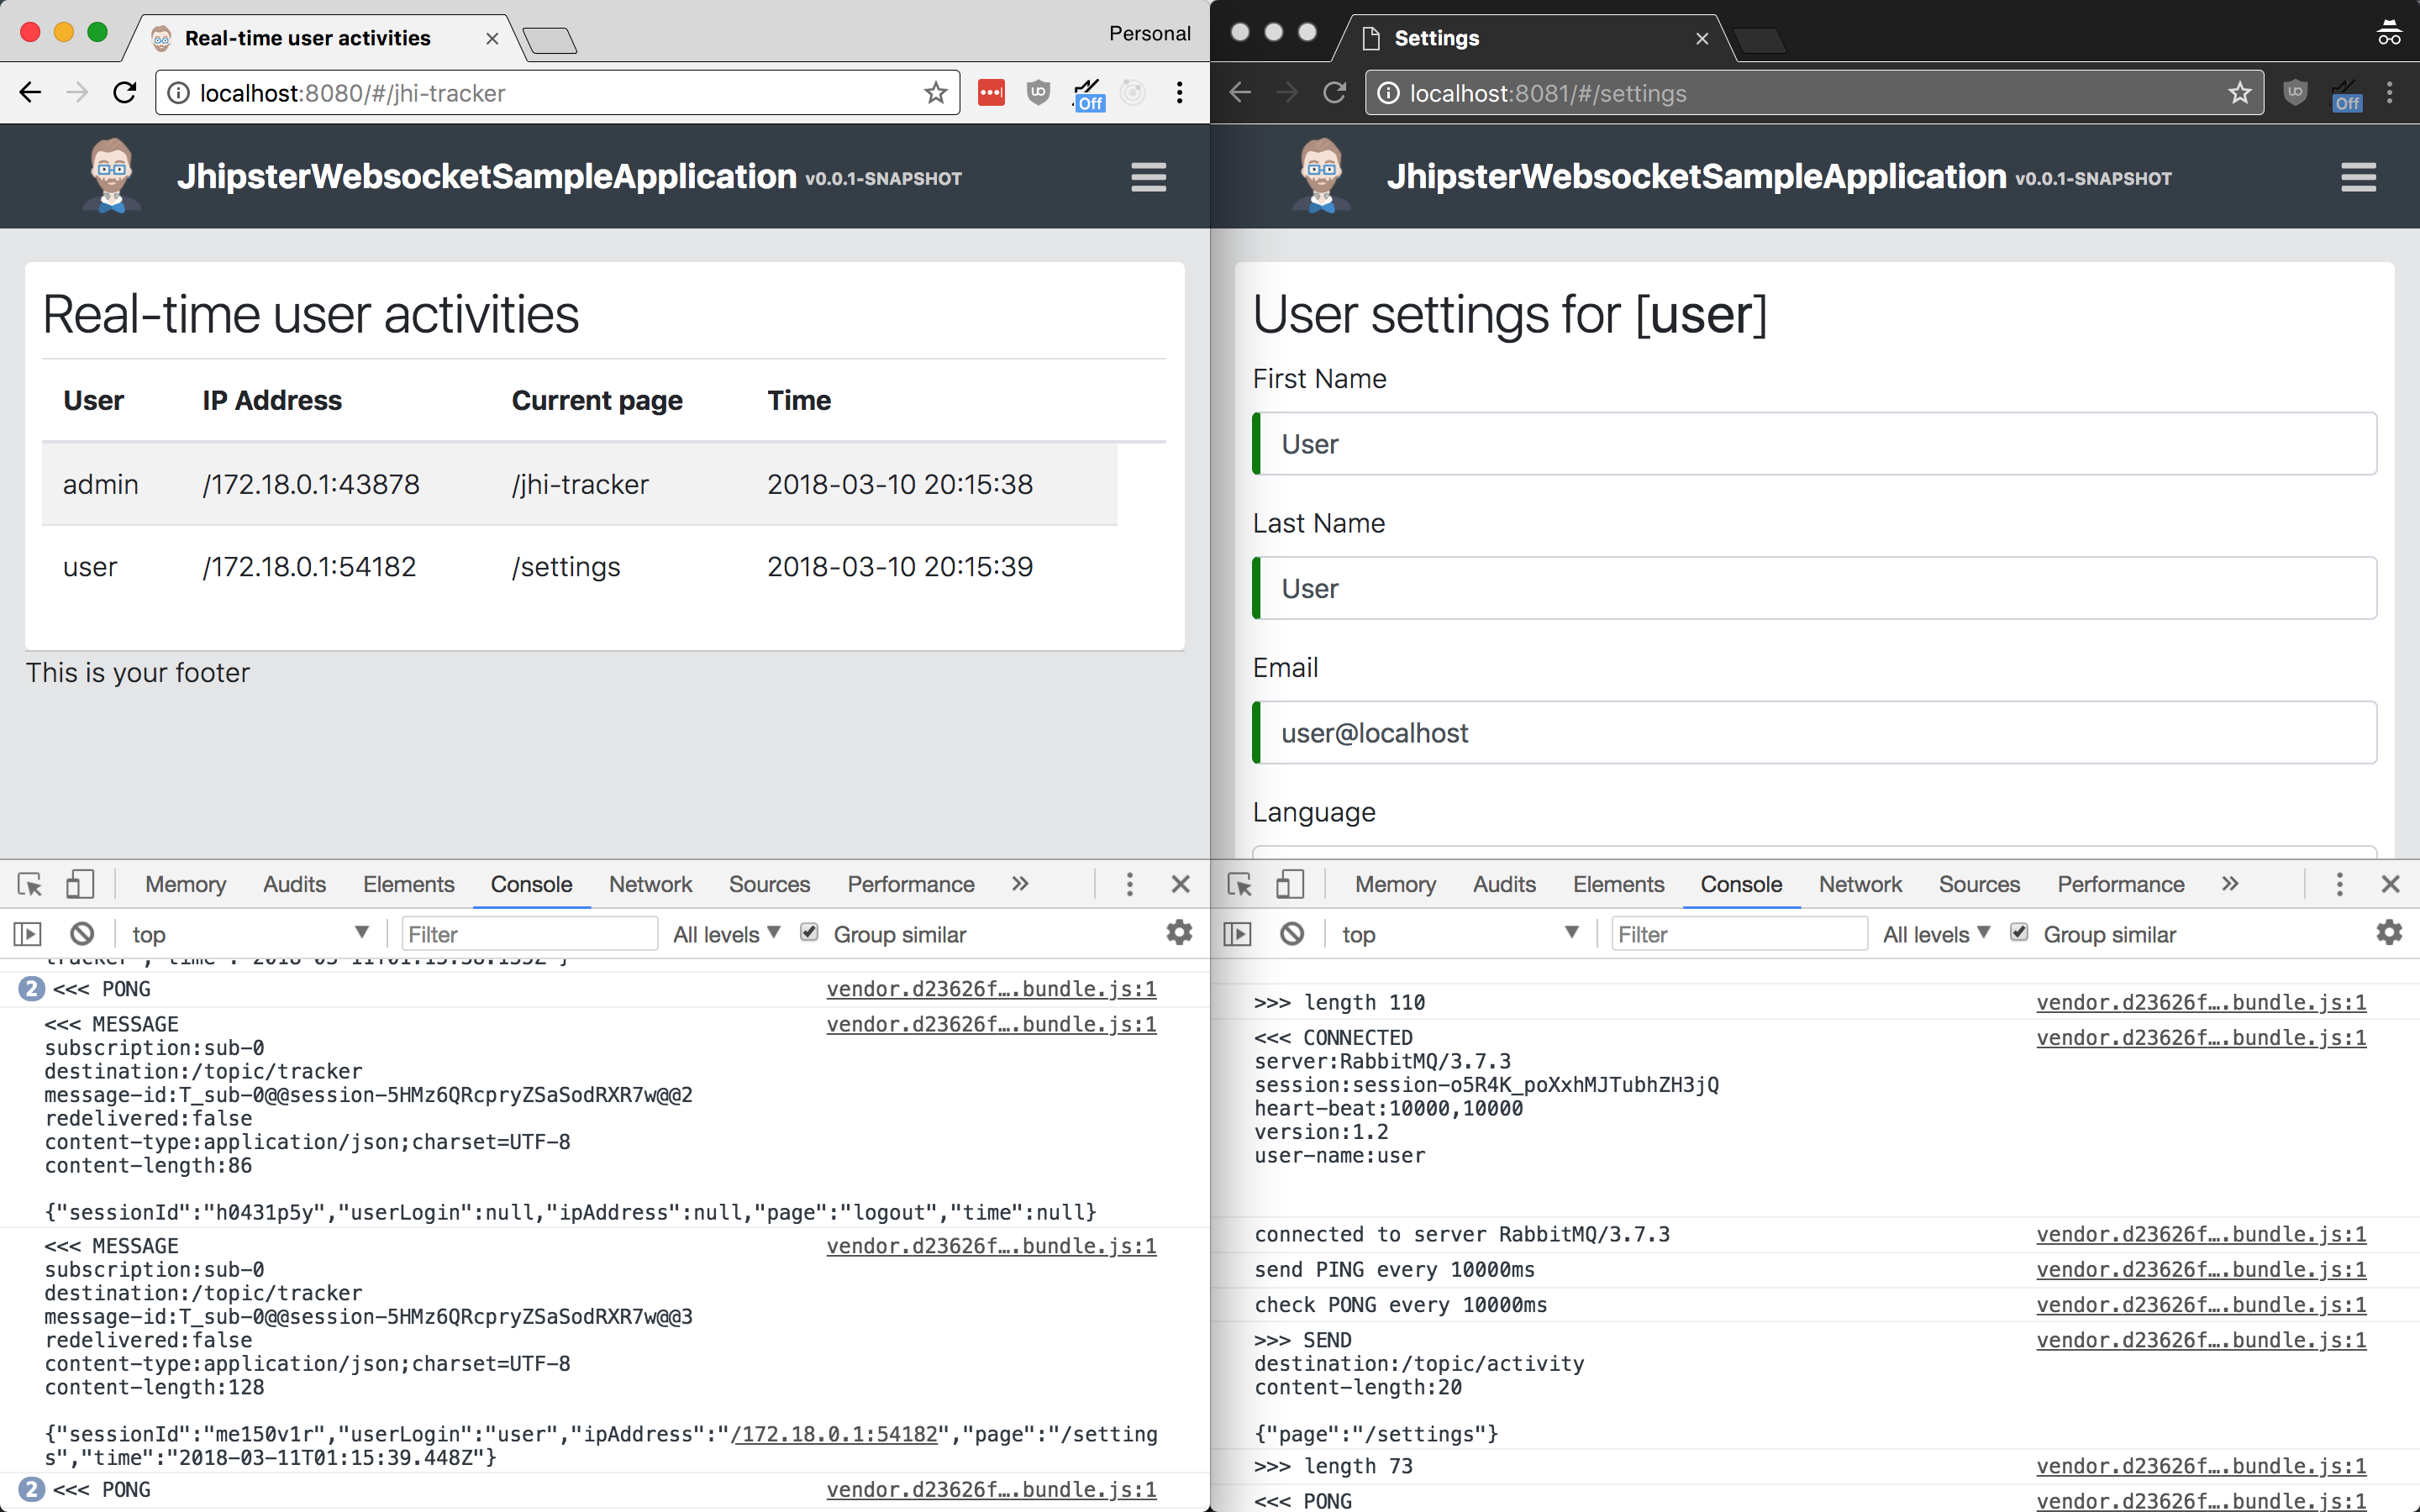 It works!
Conclusion
To summarize, an external broker such as RabbitMQ is needed to take full advantage of advanced Spring WebSockets features such as a clustered Spring Boot application. This guide walked through the startup of a JHipster app and the changes needed to configure and connect to RabbitMQ as an external STOMP broker.
Please comment below if you have any suggestions, corrections, or general comments. Thanks for reading!